HystrixCircuitBreaker
断路器是Hystrix的核心部件,但是和翟永超的书上说的已经差别很多,基本面部全非。我尝试完全自己解析一下。先看看这个接口的结构

可以看到有5个方法,3个类。
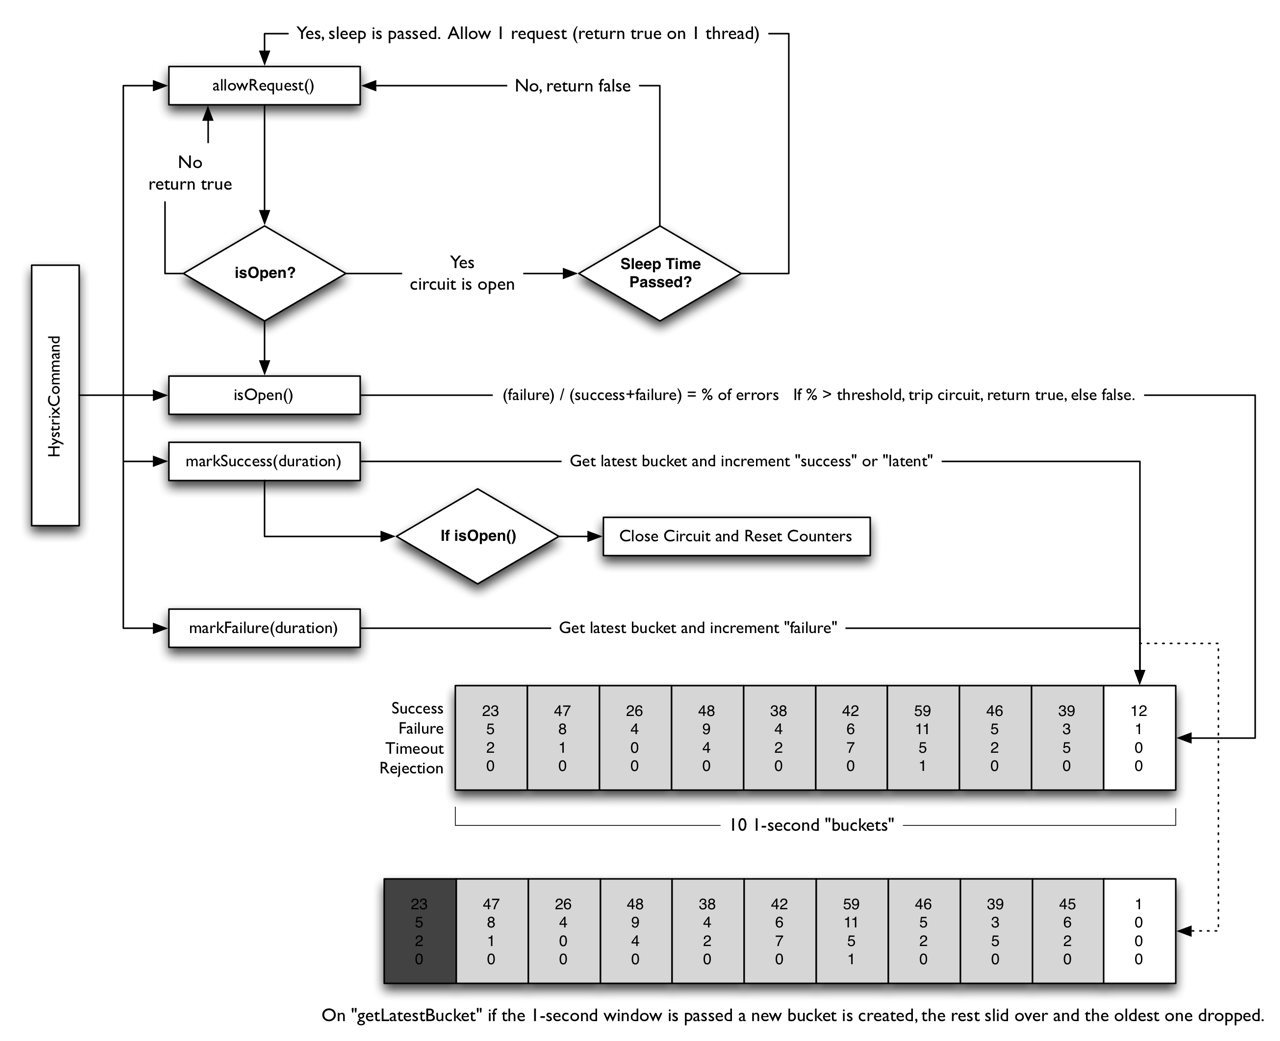
allowRequest每个HystrixCommand请求都会询问是否允许发起请求。它是幂等的,不会修改任何内部状态并考虑到半开逻辑,它允许在电路打开后通过一些请求。isOpen断路器当前是否打开,打开表示短路,不再发起后续请求。为了避免歧义,以后断路器打开称呼为触发。markSuccess断路器半开状态时,如果HystrixCommand成功执行,则作为反馈机制的一部分调用。markNonSuccess和上面相反attemptExecution在命令执行开始时调用以尝试执行。这是非幂等的 - 它可能会修改内部状态。
主要看看这3个类都是何方神圣
Factory
内部维护了一个Map circuitBreakersByCommand ,key是HystrixCommandKey的name,用来唯一表示一个HystrixCommand,value是HystrixCommand对应的HystrixCircuitBreaker。
并提供了两个方法
1 | public static HystrixCircuitBreaker getInstance(HystrixCommandKey key, HystrixCommandGroupKey group, HystrixCommandProperties properties, HystrixCommandMetrics metrics) { |
注释写的很清楚了。如果是第一次获取,做一些初始化工作,如果不是就直接调用circuitBreakersByCommand.get返回初始化时候放进去的断路器。初始化工作也很简单,new一个断路器放进去,用了putIfAbsent和ConcurrentHashMap解决线程安全的问题,所以这是一个线程安全的方法。
NoOpCircuitBreaker
一个假的实现,无论何时都允许请求继续,并且断路器永远没有触发。
HystrixCircuitBreakerImpl
原理已经在前文中讲解过了,现在主要看下代码。很明显这是一个断路器的实现,内部设置了5个成员变量1
2
3
4
5
6
7
8
9
10private final HystrixCommandProperties properties;
private final HystrixCommandMetrics metrics;
enum Status {
CLOSED, OPEN, HALF_OPEN;
}
private final AtomicReference<Status> status = new AtomicReference<Status>(Status.CLOSED);
private final AtomicLong circuitOpened = new AtomicLong(-1);
private final AtomicReference<Subscription> activeSubscription = new AtomicReference<Subscription>(null);
- properties HystrixCommand实例的各种属性
- metrics HystrixCommand实例的各种衡量指标数据
- circuitOpened 断路器上次触发的时间,有具体时间就说明断路器触发了,如果断路器关闭,这里会重新设置为-1。
- status 记录了断路器的3种状态,打开,关闭,半开
- activeSubscription 一个订阅者列表
在默认的构造方法中给metrics增加了一个订阅者,订阅者的实现1
2
3
4
5
6
7
8
9
10
11public void onNext(HealthCounts hc) {
if (hc.getTotalRequests() < properties.circuitBreakerRequestVolumeThreshold().get()) {
} else {
if (hc.getErrorPercentage() < properties.circuitBreakerErrorThresholdPercentage().get()) {
} else {
if (status.compareAndSet(Status.CLOSED, Status.OPEN)) {
circuitOpened.set(System.currentTimeMillis());
}
}
}
}
当一个滚动窗口期内的请求数量达到阈值,并且error的百分比也已经达到预定的百分比,把status设置为OPEN,并且记录下断路器触发的时间。
1 | public void markSuccess() { |
这个方法就是将断路器状态设置为CLOSED,然后清空订阅者列表,把上次断路器打开的时间设置为-1。
1 |
|
这三个方法比较简单,allowRequest执行的逻辑是,如果断路器未触发,直接允许。如果触发过,断路器处于半开状态直接拒绝请求,触发状态则继续判断是否已经过了sleep窗口期,过了就允许,没过就不允许。1
2
3
4
5
6
7
8
9
10
11
12
13
14
15
16
17
18
19
20
21
22
23
24
public boolean attemptExecution() {
if (properties.circuitBreakerForceOpen().get()) {
return false;
}
if (properties.circuitBreakerForceClosed().get()) {
return true;
}
if (circuitOpened.get() == -1) {
return true;
} else {
if (isAfterSleepWindow()) {
if (status.compareAndSet(Status.OPEN, Status.HALF_OPEN)) {
//only the first request after sleep window should execute
return true;
} else {
return false;
}
} else {
return false;
}
}
}
}
断路器触发后,经过sleep窗口期,允许第一个请求通过,前去探路,同时把状态改为半开。随后的请求不允许通过。